Archive for November, 2008

How to Jailbreak Your 2.x.x 3G iPhone Using QuickPwn (Windows)

November 4, 2008

iPhone | How to Jailbreak Your 2.x.x 3G iPhone Using QuickPwn (Windows)

Sunday, 23rd November 2008, 12:11 am

These are instructions on how to jailbreak your 3G iPhone to the 2.1-2.2 iPhone firmware using QuickPwn for Windows. Before beginning make sure you have updated to iTunes 8.0.2.

Important***: Do not attempt these instructions for the 2.2 iPhone Firmware unless you don’t care about a software unlock in the future. Using QuickPwn with the 2.2 iPhone Firmware could reduce your chances of being able to unlock the iPhone 3G.

Step One

Create a folder called Pwnage on your desktop.

Download the following files and place them in the Pwnage folder you just created:

QuickPwn 2.2

– 2.2.0 (3G): iPhone1,2_2.2_5G77_Restore.ipsw

Extract the QuickPwn22.zip file to the Pwnage folder.

Step Two

Connect your iPhone to the computer and launch iTunes.

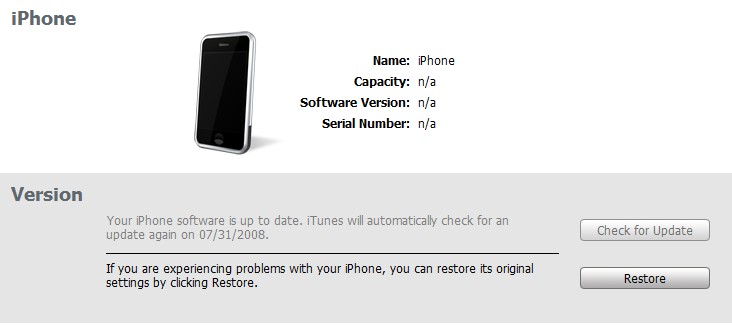
Select your iPhone from the list of devices on the left. Now hold down shift and click the Restore button. Restore is preferred as it won’t create any wasted space on your iPhone.

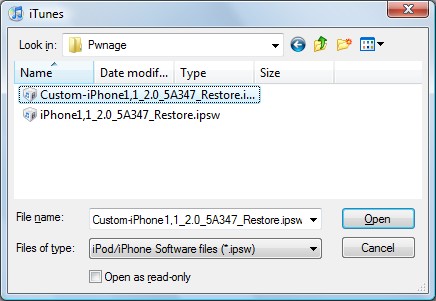
Navigate to the Pwnage folder on your desktop and select the 2.2 firmware ipsw. Click the Open button to continue.

Step Three

Once iTunes has finished updating your iPhone to the 2.2 firmware you may launch QuickPwn.exe from the Pwnage folder on your desktop.

Step Four

Make sure you iPhone is connected to the computer and click the blue arrow to continue.

Step Five

Click the Browse button to locate your iPhone firmware.

Step Six

Select the 2.2 firmware ipsw from the Pwnage folder on your desktop then click the Open button.

Step Seven

QuickPwn will check to make sure the ipsw is valid. Click the blue arrow button to continue.

Step Eight

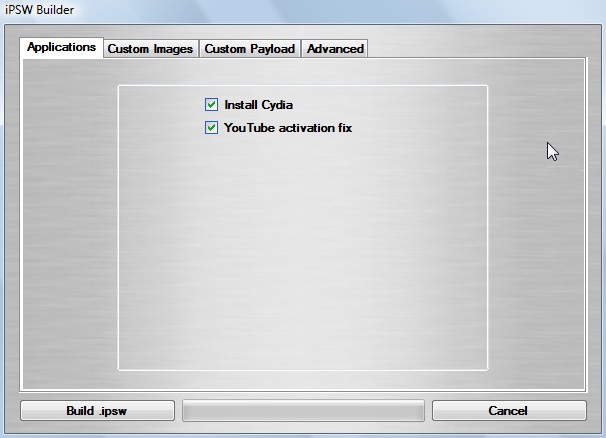
You can now select whether to Add Cydia, Add Installer, or Replace Boot Logos. Select the ones you would like to perform then click the clue arrow button

Step Nine

QuickPwn will now ask you to confirm your iPhone is connected via USB before continuing. Click the blue arrow button to proceed.

Step Ten

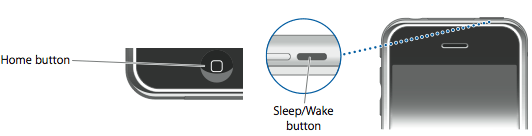
QuickPwn will now automatically put your iPhone into recovery mode. Once its in recovery mode you will be prompted to: Hold the Home button for 5 seconds, Hold the Home and Power buttons for 10 seconds, then release the Power button and continuing holding the Home button until your iPhone is in DFU mode.

Watch the prompts carefully and follow along.

Step Eleven

Once QuickPwn detects your iPhone in DFU mode it will begin the jailbreak process.

Step Twelve

Once jailbreaking is complete QuickPwn will inform you that it was successfull.

——————————————-

How to Activate / Jailbreak Your 2.0.x 3G iPhone (Windows) [WinPwn 2.5]

November 4, 2008

These are instructions on how to jailbreak your 2.0.x 3G iPhone using WinPwn 2.5 for Windows. They have been updated for iPhone firmware 2.0.2.

Please follow the tutorial here at the iClarified.
Your iPhone will now be restored to the jailbroken 2.0.x firmware of your choice!

iPhone 3G Real Unlock

November 3, 2008

The new iPhone 3G cannot be unlocked by any software solution till date.
All websites claiming to have a solution are scam, We advise all users to be careful.

The only solution in the world to unlock iPhone 3G is Rebel Simcard.
Because Rebel Simcard goes along with your network simcard into you iPhone 3G and
bypasses the network locks without doing any firmware modification.

Here is a complete manual on how to unlock your iPhone 3G.

First you would need to identify that your iPhone 3G is in what state as of now.

There are only 2 possible states as of now.
Switch on your iPhone 3G.
1. State 1 : You can see itunes logo along with a usb cable, and a slide button showing “Slide for emergency”.
If you slide the bar then a keypad appears.
If this is the case your Phone is not activated, and you will have to activate your phone before you can unlock it.

2. State 2 : You have switched on your iPhone 3G and you can see the springboard with a lot of icons like SMS, Calender etc..
You are lucky!! Unlocking your iPhone is very simple now.

If your iPhone is in State 1 listed above, follow these procedures.
Please note : All info available here is only for educational purposes, We are not responsible in any case whatsoever how you use this information.

http://www.iclarified.com/entry/index.php?enid=1573

Once you have followed this procedure, your iPhone menu will appear, which means your iPhone is activated and now is equivalent to Stage 2 listed above.

Now you should follow the stage 2 procedure to unlock your iPhone 3G.

If your iPhone 3G is in State 2 listed above, follow these procedures.

You will need.
1. Rebel Simcard – Buy one from http://www.rebelsimcard.com
2. A network simcard which you want to use on your iPhone 3G.
3. Any other phone to test the simcard you want to use on your iPhone 3G.
4. Rebel Simcard cutter to cut your original network simcard.

Now follow the following steps exactly as listed.

1. Switch on the other phone with the simcard which you want to use on your iPhone 3G.
Make a call to make sure your simcard is working fine and also this step will enable your sim to
receive some data from your network which is required for further process.

2. Now take out simcard from this phone.

3. Now take your iPhone 3G, enable Airplane mode and disable 3G and put the Rebel Simcard along with this simcard in your iPhone 3G.
Wait a few seconds, and disable Airplane mode to get network on phone.
Your phone should get network. (If it doesn’t get network, please try to switch off your iPhone for 5 minutes and retry the whole process. )
Now you can use your iPhone 3G as if it was unlocked.
You can now use EDGE, GPRS and all functions of iPhone 3G.
3G service depends on the type of simcard you have and it also depends on the availability of 3G network in your area.
All those countries where there is no 3G, users are advised to switch off 3G mode.

Please note : You should not skip step1 listed above.

How to Unlock iPhone 2G and upgrade to latest version 2.0

November 2, 2008

Before you should start to unlock your iPhone. You should know which iPhone you have.
This manual will take you step by step to make your iPhone 2G working with any network.

We will choose the best possible way available till today to make your iPhone working on any network.
All those who have a bricked iPhone can also follow these steps.
Which iPhone do you have ?
1. iPhone 2G (The older iPhones are called iPhone 2G. You can see this image to check which iPhone you have.)
2. iPhone 3G ( The newer iPhone is the iPhone 3G. You can see its image here.

If you have iPhone 2G, Please follow the following steps. For iPhone 3G procedure there is another post coming up on this blog.

iPhone 2G – Step by Step procedure for Windows users.

iPhone 2G users are more lucky, The latest version of iPhone can be unlocked and jailbroken to use any network simcard.
Phone will work fully with all features using this procedure.
However iPhone 3G can only be jailbroken but cannot be unlocked, The only solution in this world to unlock the iPhone 3G is Rebel Simcard.

Please Note : With this procedure you will lose all data on your iPhone , and it will become like a new out of the box phone. This means you will lose all your contacts, images, etc…

1. You should download the following softwares.
a. iTunes 7.7 Download from apple.com
b. Firmware 2.0 for iPhone (Tested) Download Part1.Download Part2.
c. WinPwn Download here or find a latest version from http://www.winpwn.com
d. .Net 2.0 Framework Download here.
e. 3.9BL
f. 4.6BL

After downloading all this,

Install
1. iTunes 7.7.
2. .Net 2.0 Framework.
3. WinPwn.

Please note
– You MUST do a full uninstall of winpwn before installing the new version
– Make sure you have the latest version of iTunes ( Currently 7.7)
– WinPwn uses 300MB of ram at peak due to the ipsw being extracted in memory
– If you already have service with AT&T do not activate or install Youtube Fix


Create a folder on your desktop called Pwnage. In it place the following files: Winpwn , 3.9BL , 4.6BL , and the latest 2.0 firmware.

Install WinPwn by extracting the downloaded zip from Step One and running the setup executable. Once WinPwn has been installed it will put a shortcut icon on your desktop. Double click to launch the application.

Once WinPwn has opened click the Browse .ipsw button.

Locate the 2.0 firmware file (iPhone1,1_2.0_5A347_Restore.ipsw) from the Pwnage folder on your desktop and click Open.

WinPwn will check the firmware to make sure its valid. Now click the IPSW Builder button

The IPSW Builder window will open to the Applications tab. Check to select Cydia and if you are not on AT&T then check to select YouTube Fix.

Click to select the Advanced tab. Check to select: Activate Phone, Enable Baseband update, and Unlock baseband. Same settings as shown in this image.

We will also need to load the Bootloader files. Click the Bootloader 3.9 button and then select the BL39.bin file in your Pwnage Folder. Then click the Bootloader 4.6 button and select the BL46.bin file in your Pwnage Folder.

Click the Build .ipsw button at the bottom left to build your custom ipsw firmware file. Navigate to your Pwnage folder and click the Save button

Once WinPwn has finished creating your custom firmware then click the iPwner button from the main menu.

Select the custom firmware file we just built from the Pwnage folder on your desktop and click the Open button.

You will then be notified that your iTunes has been Pwned!

Next we will need to put the iPhone in the DFU mode and restore using iTunes. To put your iPhone into DFU mode please follow these instructions!
Press and hold the Home button and the Sleep/Wake button at the same time.

After exactly 10 seconds release the Sleep/Wake button. Continue holding the home button until you iTunes pops up a message telling you that it has detected an iPhone in recovery mode.

The iPhone screen will remain black like this:

If you see the itunes logo and cable here, then you are doing wrong!!! The phone must be black screen like this. Most users make this mistake, be careful.

Hold down Shift and click the Restore button in iTunes.

A popup window will appear asking you to select your firmware. Select the Custom firmware file we saved in the Pwnage folder and then click the Open button.

Once the restore is complete a software will automatically run on your iPhone screen.
It will take around 5-10 min to finish, and your phone will be unlocked and jailbroken.

Now just insert your simcard and use it with any network simcard!!

Apple iphone 3G unlock with Rebel SimCard

November 1, 2008